Introducing: Floor Plan
See availability at a glance and make faster bookings with an interactive floor plan
September 20, 2025
TL;DR
The wait is over: Floor Plan has arrived in Optix! This highly anticipated feature gives you an interactive map of your workplace, so you can see availability in real time, assign desks or offices in seconds, and give members a smooth experience from day one.
In this post, we’ll walk you through what Floor Plan is, how it works inside Optix, and how you can start putting it to work in your space today.
Floor Plan is currently in closed beta. If you’re ready to be among the first to explore it, reach out through the chat function in your Optix dashboard and we’ll get you set up.
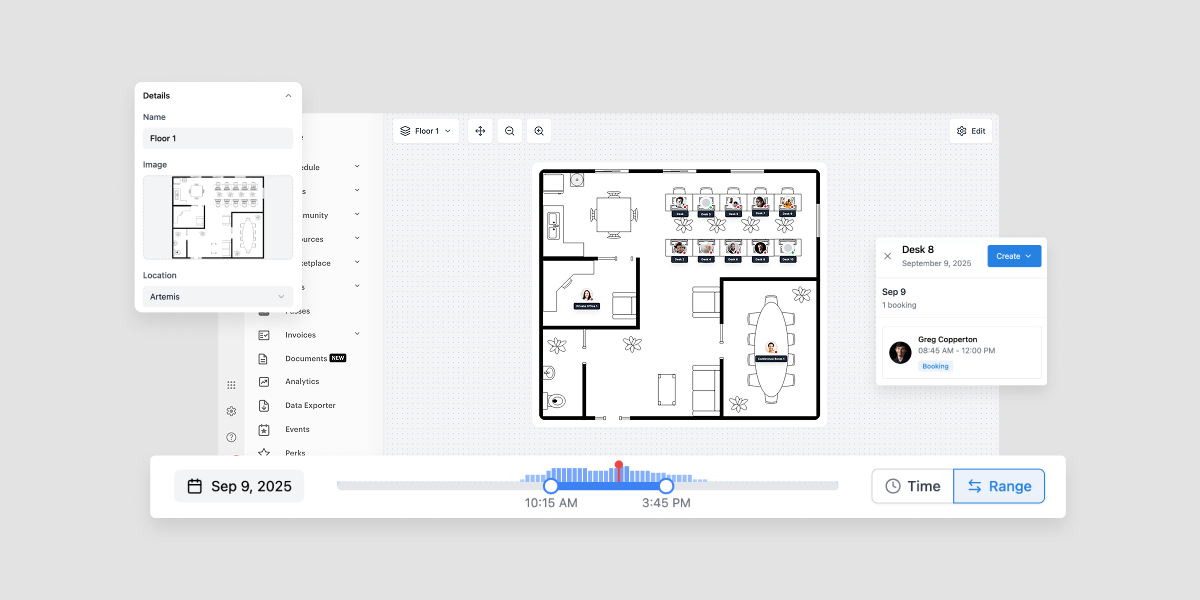
Floor Plan is an admin-facing tool that overlays real-time bookings and availability directly onto your floor layout, so you always know what’s happening and when. Whether it’s desks, offices, studios, or any other resource, you can see occupancy at a glance and take action in seconds.
With Floor Plan, you can:
It’s fast, intuitive, and designed to help your team move from “who’s free when?” to “done” in just a few clicks.

Ever wish you had a quick and easy way of seeing all bookings in Optix? Now you have it. Here’s what you can do with Floor Plan.
With Floor Plan, your entire operation gets clearer: what’s available, what’s booked, and how your members interact with your space.
Getting started with Floor Plan is simple. In just a few steps, you can turn a static floor plan into a dynamic, interactive map that powers your day-to-day operations.
Add a new floor map for your location and upload an image file or a PDF, whether it’s a polished architectural export or a simple diagram. Then, fine-tune the visual settings (like pin size and contrast) so everything is crystal clear at a glance.
Drop in hot desks, offices, and any other resources you want to track. If your setup requires nuance, you can also configure parent/child relationships and blocking rules to reflect how your space really works.
Use the time slider to check availability at any specific moment or time range in a day, or switch to the date-range view to spot multi-day or even multi-month gaps for longer assignments. It’s quick, visual, and eliminates the guesswork.
Click on any resource to open the booking panel and create a booking or assignment right from the map. No extra steps, no jumping between screens, just one easy-to-use workflow.
Note: Floor Plan works with your existing resource settings and booking rules. Think of it as a powerful visual layer built on top of the schedule you already know and use.
Floor Plan unlocks a new way of managing your space day-to-day. Here are just a few ways operators are already putting it to work:
With Floor Plan, you can move from reactive to proactive, simplifying daily operations while creating a better experience for both staff and members.
Floor Plan is a completely new way to manage resource bookings in your space, and we think you’re going to love what it can do for your business.
Floor Plan is currently in closed beta, and we’re actively gathering feedback to shape the general release. If you’d like access, reach out through the chat function in your Optix dashboard or connect with your Customer Success Manager—we’d love to hear what you think!
At this stage, Floor Plan is an admin-facing tool. Members still book through the app, while admins can create or assign bookings from the map.
Any clear image file (JPG, PNG) or PDF works. Many operators upload an exported floor plan from their architect, but even a simple diagram can get you started.
That’s okay! You can sketch a simple layout or use an app to generate a floor map. The feature is flexible as long as the image is clear enough to place resources.
Yes. You can upload additional maps for each floor or each location and manage them all from within Floor Plan.
Floor Plan reflects your existing booking rules and resource settings in Optix. It’s the same data you’d see in your schedule—just visualized on a map.
Yes. If a parent resource is booked, its child resources will show as unavailable, and vice versa.
If you operate multiple locations, Floor Plan automatically adjusts to the correct time zone of each map. Times are clearly labeled to avoid confusion.